
Have you ever wanted to truly customize your Android device, moving beyond simple wallpaper changes and exploring the depths of its potential? Unlocking your phone’s bootloader is the first crucial step on this journey. This comprehensive guide will walk you through the process, providing a detailed, step-by-step approach to unlocking your bootloader, opening a world of possibilities for custom ROMs, rooting, and deep system modifications.
This guide offers a clear and concise methodology for unlocking the bootloader on various Android devices. Understanding the implications of an unlocked bootloader is paramount, as it affects your warranty and security. We’ll cover the necessary precautions, potential risks, and advantages, ensuring you’re fully prepared before you begin. Whether you’re aiming for root access, a custom recovery installation, or simply want to experience the full potential of your Android phone, this guide is your key to unlocking the bootloader and taking control.
Understanding Bootloaders and Their Functionality
Before diving into the process of unlocking your phone’s bootloader, it’s essential to understand what a bootloader is and its function. A bootloader is a critical piece of software that’s the first thing to run when you power on your device. Think of it as the gatekeeper to your phone’s operating system.
Its primary function is to initialize the hardware, including the processor, memory, and peripherals, then load the operating system kernel into memory and begin the boot process. This ensures that your phone starts up correctly and loads the Android system (or whatever OS your phone uses).
Typically, manufacturers lock the bootloader to prevent unauthorized modifications to the operating system, ensuring the device runs the intended software. However, unlocking the bootloader allows you to install custom operating systems (like custom ROMs), custom recoveries, and other modifications.
Risks and Benefits of Unlocking the Bootloader
Unlocking your bootloader presents both advantages and disadvantages. It’s crucial to weigh these carefully before proceeding.
Benefits
A primary benefit is the ability to install custom ROMs. These offer modified Android experiences, often with enhanced features, performance tweaks, and the latest Android versions even if your manufacturer no longer provides updates. You can also install custom recoveries, enabling advanced backup and restore functionalities.
Risks
Unlocking introduces risks. It can void your warranty, meaning the manufacturer may not cover repairs if something goes wrong. There’s a risk of bricking your device, rendering it unusable, particularly if the unlocking process is interrupted or performed incorrectly. Unlocking also typically wipes your data, so creating backups is essential. Finally, an unlocked bootloader can potentially make your device more vulnerable to security threats if you’re not careful about the software you install.
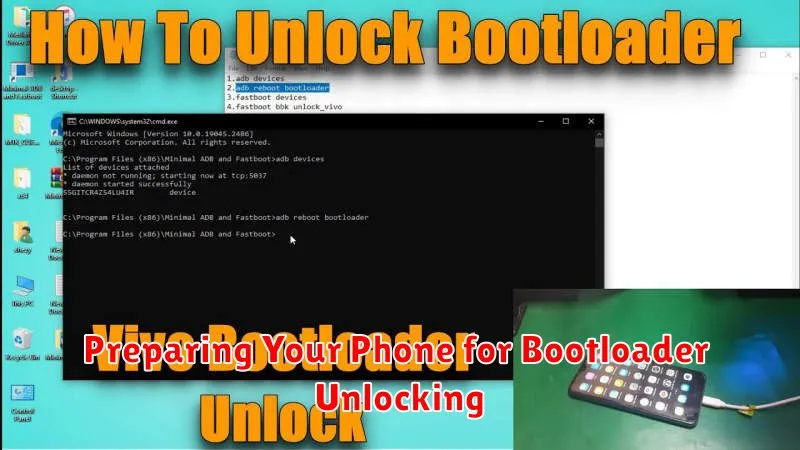
Preparing Your Phone for Bootloader Unlocking
Before proceeding with unlocking your phone’s bootloader, it’s crucial to take certain preparatory steps. These steps ensure a smooth unlocking process and safeguard your data.
Back Up Your Data
Unlocking the bootloader will typically erase all data on your device. This includes photos, videos, apps, and other personal files. Backing up your data is essential to prevent permanent loss. Utilize your phone’s built-in backup features, cloud services, or connect your phone to a computer to create a comprehensive backup.
Charge Your Phone
Ensure your phone has a sufficient battery charge. The unlocking process can take time, and an interruption due to low battery can cause complications. A minimum of 50% charge is recommended, but a full charge is ideal.
Install Necessary Drivers
You might need specific drivers installed on your computer to interact with your phone in bootloader mode. Check your phone manufacturer’s website for the correct USB drivers for your device model and operating system. Install these drivers beforehand to avoid any issues during the unlocking process.
Enable USB Debugging and OEM Unlocking
These options are usually found in the Developer Options menu in your phone’s settings. Enabling them is required for your computer to communicate with your phone’s bootloader. Instructions for enabling Developer Options vary depending on your phone’s make and model. Generally, it involves repeatedly tapping the “Build number” in the “About Phone” section of your settings.
Step-by-Step Instructions for Unlocking Your Bootloader
The process for unlocking your bootloader varies depending on the manufacturer and model of your phone. However, the general steps are similar. Be sure to consult your device’s specific unlocking instructions for the most accurate information.
Step 1: Enable Developer Options and USB Debugging. Usually, this involves tapping the ‘Build number’ in your phone’s settings repeatedly until Developer Options are enabled. Within Developer Options, activate “USB Debugging.”
Step 2: Install Necessary Drivers. Ensure your computer has the correct USB drivers for your phone. These are often available on the manufacturer’s website.
Step 3: Connect Your Phone to Your Computer. Use a USB cable to connect your phone to your computer. Ensure your phone is recognized.
Step 4: Open a Command Prompt or Terminal. On your computer, navigate to the platform-tools folder within your Android SDK installation directory and open a command prompt or terminal window.
Step 5: Enter the Unlock Command. The specific command varies by manufacturer. A common command is fastboot oem unlock. Some manufacturers require obtaining an unlock code first.
Step 6: Confirm the Unlock on Your Phone. Your phone will display a confirmation prompt. Use the volume keys to navigate and the power button to select “Unlock.”
Troubleshooting Common Bootloader Unlocking Issues
Unlocking your bootloader can sometimes encounter hiccups. This section addresses common issues and their solutions.
Device Not Recognized by Computer
Ensure proper drivers are installed. Check your manufacturer’s website for specific USB drivers. Verify the USB cable is functioning correctly and try a different port. Enable USB debugging mode in your phone’s developer options.
Unlock Command Not Recognized
Double-check the command syntax. Ensure it’s accurate for your specific device. Verify fastboot is correctly installed and accessible in your system’s path. Try a different fastboot version.
Bootloop After Unlocking
This can indicate a corrupted or incompatible custom recovery or ROM. Reinstall the stock firmware to restore your device to its original state. Ensure you’re using the correct firmware version for your phone model.
Restoring Your Phone to Its Original State

After exploring the world of custom ROMs and modifications, you might decide to return your phone to its factory settings. This process, often referred to as “returning to stock,” involves reinstalling the original operating system and locking the bootloader.
Backing up your data is crucial before proceeding. This ensures you don’t lose important files during the restoration process. Utilize your phone’s built-in backup features or third-party apps to safeguard your information.
The method for restoring your phone varies depending on the manufacturer. Generally, you’ll need the original firmware for your specific device model. This can usually be downloaded from the manufacturer’s website. Tools provided by the manufacturer, such as desktop software or fastboot commands, are typically used to flash the firmware.
After restoring the original firmware, you can re-lock the bootloader if desired. This enhances security and might be required for warranty purposes. The process for re-locking is often similar to the unlocking procedure, but in reverse.
Exploring Custom ROMs and Other Modifications
With an unlocked bootloader, a world of customization opens up. Custom ROMs are essentially aftermarket operating systems for your phone. They offer various advantages, from enhanced performance and battery life to entirely new features and a stock Android experience.
Besides ROMs, other modifications are possible. You can install custom kernels for better performance or power management. Systemless root allows root access without modifying the system partition, which can be beneficial for certain apps and functionalities.
Important Note: Flashing custom ROMs and kernels involves inherent risks. Thorough research and understanding of the process are essential. Always back up your data before proceeding with any modifications.
Choosing a custom ROM depends on your device and preferences. Consider factors like stability, features, and community support when making your selection. Resources like XDA Developers forums can provide valuable information and assistance.