
Need to create a tutorial video, record a gameplay session, or document a software bug on your Android device? Screen recording is an invaluable tool for capturing everything happening on your screen, and luckily, Android makes it easy. This simple guide will walk you through the various methods available for screen recording on Android, from built-in features to third-party apps. Learn how to capture your screen, customize your recordings, and produce high-quality videos with clear audio.
Whether you’re a seasoned content creator or new to screen recording, this comprehensive guide will provide you with the knowledge and tools you need to capture your screen effectively on your Android device. We’ll explore the different options available for recording your screen, including native Android screen recording functionality, as well as some recommended screen recorder applications. By the end of this guide, you’ll be equipped to create professional-looking screen recordings with ease.
Built-in Screen Recording Tools on Android
Many Android devices come equipped with native screen recording functionality, eliminating the need for third-party apps. Locating this feature can vary slightly depending on your device’s manufacturer and Android version. Generally, the screen recorder is accessible through the quick settings panel.
To access the quick settings, swipe down from the top of your screen. Look for a screen recording icon, often represented by a small circle with a dot in the center. If you don’t immediately see it, you may need to expand the quick settings panel to reveal more options. Some manufacturers may label this feature “Screen recorder,” “Screen capture,” or something similar.
Once you’ve located the screen recording icon, a simple tap will usually initiate the recording. You might be presented with options to configure settings like audio source (internal audio, microphone, or both) and video resolution before starting. Pay close attention to these options to ensure your recording captures everything you need.
After you’ve configured your settings, tap the “Start Recording” button. A countdown timer will typically appear before the recording begins. Stopping the recording is usually as simple as tapping the screen recording notification or accessing the quick settings panel again. The recorded video is then saved to your device’s gallery or photos app.
Third-Party Screen Recording Apps
If your Android device doesn’t have a built-in screen recorder, or you’re looking for more advanced features, third-party apps are a great option. The Google Play Store offers a wide variety of screen recording apps, each with its own set of functionalities.
When choosing a third-party app, consider features like resolution settings, frame rate control, audio recording options (internal or external microphone), and the ability to add annotations or overlays. Some apps also offer video editing tools directly within the app, streamlining the post-recording process.
It’s important to carefully review the app’s permissions before installing. Ensure the app only requests necessary permissions for screen recording and avoid apps with overly intrusive access requirements. Reading user reviews can also provide valuable insights into an app’s performance and reliability.
Customizing Your Screen Recording Settings
Most Android devices and screen recording apps offer various customization options to tailor your recordings to your specific needs. Understanding these settings can significantly enhance the quality and usability of your captured content.
Resolution: Adjusting the resolution impacts the clarity of your recording. Higher resolutions (e.g., 1080p) result in sharper visuals but larger file sizes. Lower resolutions (e.g., 720p) are suitable for smaller screens or when storage space is limited.
Frame Rate (fps): Frame rate determines the smoothness of the recording. Higher frame rates (e.g., 60fps) capture smoother motion, ideal for gaming videos. Standard frame rates (e.g., 30fps) are sufficient for general screen recordings.
Bit Rate: Bit rate affects the overall video quality and file size. A higher bit rate results in better video quality but also a larger file size. Experiment to find a balance that suits your needs.
Audio Source: Choose between recording internal audio (system sounds and app audio) or using your device’s microphone to capture external audio. Some apps allow simultaneous recording from both sources.
Orientation: Select between landscape or portrait orientation depending on the content you’re recording.
Troubleshooting Common Screen Recording Issues
Encountering problems while screen recording on your Android device? Here are some common issues and how to resolve them:
No Audio
If your screen recording has no sound, ensure that the “Record audio” option is enabled in your screen recorder’s settings. Also, check your device’s volume and ensure it’s not muted. Some apps may block audio recording for copyright reasons.
Recording Stops Unexpectedly
A sudden stop in recording can be due to insufficient storage space on your device. Free up space by deleting unnecessary files or apps. It could also be a temporary system glitch; try restarting your device.
Poor Video Quality
If the recording quality is low, check the resolution and frame rate settings within your screen recorder. Lowering the resolution or frame rate can improve performance on less powerful devices.
Tips for Creating High-Quality Screen Recordings
Creating professional-looking screen recordings requires attention to a few key aspects. Planning is essential. Storyboard or outline your content beforehand to ensure a smooth and concise recording. This helps avoid unnecessary rambling and keeps your viewers engaged.
Audio quality greatly impacts the viewer experience. Consider using a good quality external microphone if your device’s built-in microphone doesn’t produce clear sound. Minimize background noise as much as possible for optimal clarity.
Visual clarity is paramount. Ensure your screen’s resolution is set appropriately for the recording. Declutter your display by closing unnecessary applications and tabs to minimize distractions. Practice your actions before starting the actual recording to avoid fumbles and ensure a polished presentation.
Sharing Your Screen Recordings
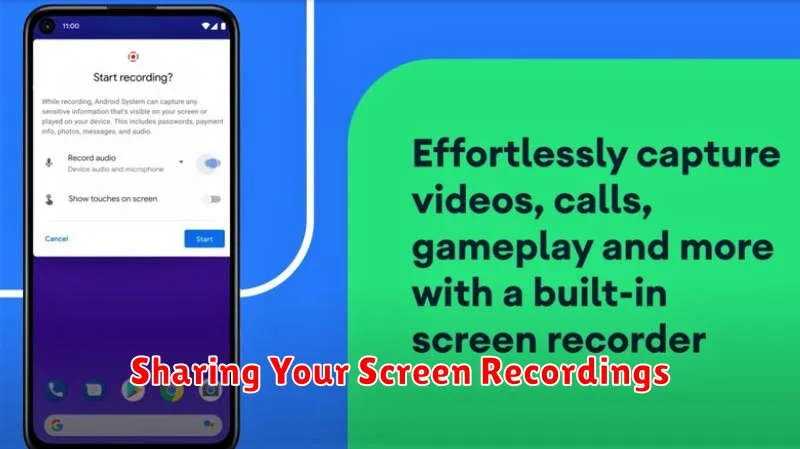
Once you’ve captured your screen recording, sharing it is typically a straightforward process. Most Android devices offer direct sharing options from within the screen recorder interface or from the notification that appears after recording. Look for share icons often represented by a curved arrow, or three interconnected dots. These icons allow you to select the method of sharing, whether it be through a messaging app, social media platform, or cloud storage service.
Before sharing, you might want to trim or edit your video. Some screen recorders provide basic editing tools to remove unnecessary sections from the beginning or end of your recording, or even to add annotations. This can help you create a more concise and engaging shareable video.
Consider the file size of your recording. Larger files might take longer to upload and share, especially if you’re using mobile data. Some platforms may have file size limitations as well. You may need to compress or shorten your recording for optimal sharing.
Recording Internal Audio on Android
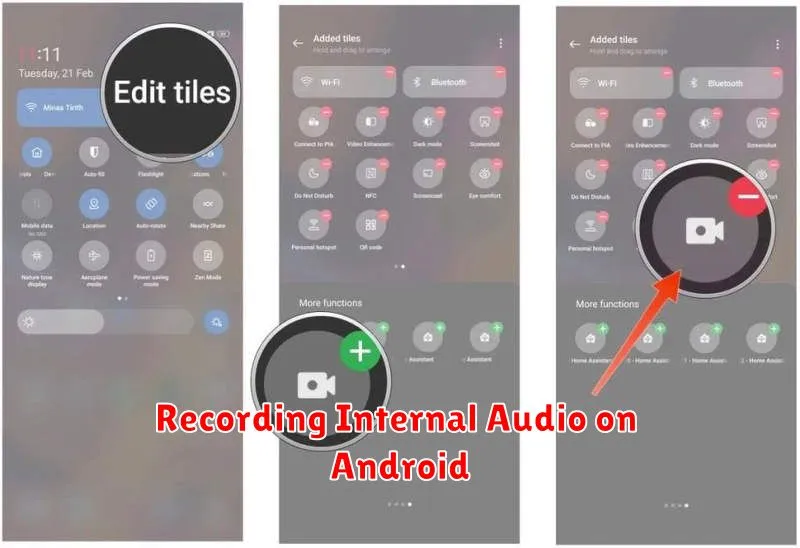
Recording internal audio alongside your screen capture can significantly enhance your videos, especially for tutorials, gameplay recordings, or capturing music. However, directly recording internal audio isn’t a standard feature on all Android devices due to system limitations and copyright concerns. The availability and method often depend on your device’s manufacturer, Android version, and sometimes, specific apps.
Some manufacturers, like Samsung, include a built-in screen recorder with an internal audio recording option. Check your device’s quick settings panel for a “Screen recorder” or similar icon. If present, look for audio source options within the recorder’s settings. You might see choices like “Internal audio,” “Media sounds,” or “Game sounds.”
If your device doesn’t offer native internal audio recording, third-party apps might be a solution. However, be aware that these apps often have limitations. Some require root access, while others might only capture audio from specific sources. Research available apps carefully and read reviews before installing them. Always prioritize apps from reputable developers.