
Is your Samsung device running slow, experiencing glitches, or displaying outdated information? One of the most effective ways to troubleshoot these issues is by clearing the cache. This comprehensive guide will walk you through the various methods of clearing the cache on your Samsung device, including app cache, browser cache, and system cache. Learn how to optimize your device’s performance and reclaim valuable storage space by mastering the art of cache clearance. Whether you’re using a Galaxy S series phone, a Note tablet, or another Samsung device, this guide has you covered.
Clearing the cache on your Samsung device can resolve a multitude of problems, from sluggish performance to app crashes. By regularly clearing the cache, you can ensure that your Samsung device runs smoothly and efficiently. This guide will provide step-by-step instructions on how to clear the app cache, clear the browser cache (including Chrome, Samsung Internet, and other popular browsers), and clear the system cache. We’ll also explain the differences between these various cache types and the benefits of clearing each one. Follow along to learn the best practices for cache management on your Samsung device.
Understanding Different Types of Cache on Samsung
Samsung devices, like most Android systems, utilize several types of cache to improve performance and streamline operations. Understanding these distinctions is crucial for effective cache management.
Primarily, we can categorize cache into two main types: app cache and system cache.
App Cache
Each installed application stores its own cache data. This includes temporary files, frequently accessed data, and other information that allows the app to load and operate more quickly. Clearing app cache typically addresses individual app issues without affecting other apps or system data.
System Cache
System cache, on the other hand, stores temporary files used by the Android operating system itself. This includes system updates, frequently accessed system data, and other elements that help the overall system run smoothly. Clearing the system cache can often resolve system-wide performance issues and free up storage space.
Steps to Clear App Cache on Samsung Devices
Clearing individual app caches can resolve app-specific issues like freezing or crashing. It’s a less drastic measure than clearing all app data, as it preserves your app preferences and login information.
Follow these steps to clear the cache of a specific app:
- Open the Settings app on your Samsung device.
- Navigate to Apps.
- Locate and select the specific app you want to clear the cache for.
- Tap on Storage.
- Select Clear Cache.
This process removes temporary files stored by the app, which can free up storage space and potentially resolve performance problems.
Clearing System Cache on Samsung for Improved Performance
Clearing the system cache on your Samsung device can resolve various performance issues, such as lagging or unresponsiveness. The system cache stores temporary files used by the Android operating system, and over time, these files can become corrupted or outdated, leading to decreased performance. Clearing this cache can free up valuable space and improve the overall speed and responsiveness of your device.
It is important to note that clearing the system cache is different from performing a factory reset. Clearing the system cache will not delete your personal data, such as photos, videos, or apps. It only removes temporary system files. However, it’s always a good practice to back up your important data before performing any system maintenance.
To clear the system cache, you’ll need to boot your device into Recovery Mode. The steps to access Recovery Mode might vary slightly depending on your Samsung model, so consult your device’s user manual for the precise key combination. Generally, it involves powering off the device, then holding a combination of buttons, such as Volume Up, Power, and Home (or Bixby).
Using Recovery Mode to Wipe Cache Partition
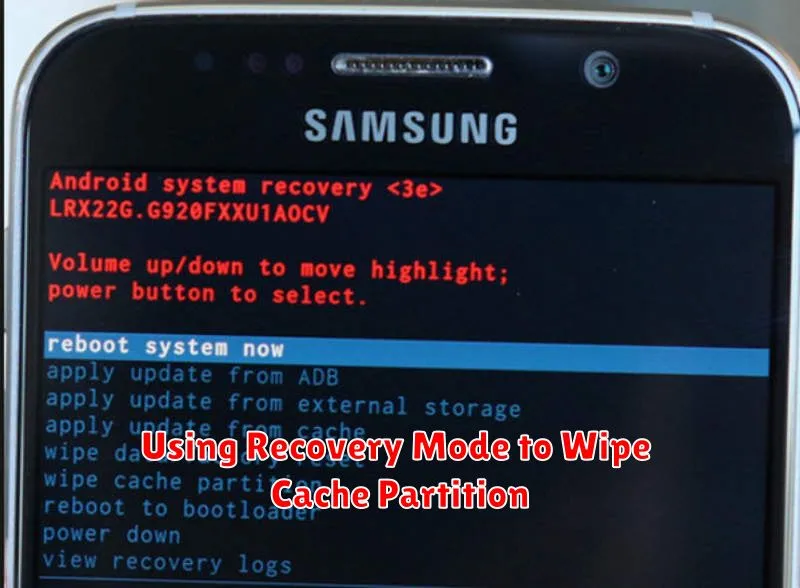
Wiping the cache partition is a more advanced method of clearing cache on your Samsung device. This process deletes temporary system files, which can sometimes resolve performance issues or software glitches. It’s important to note that this process is different from a factory reset and will not delete your personal data.
To wipe the cache partition, you’ll need to boot your device into Recovery Mode. The steps to enter Recovery Mode can vary slightly depending on your specific Samsung model, but typically involve a combination of pressing the power, volume up, and/or Bixby buttons. Always refer to your device’s user manual or Samsung’s support website for the precise instructions for your model.
Once in Recovery Mode, navigate using the volume buttons to highlight the “Wipe cache partition” option. Select it using the power button. Confirm your selection and allow the process to complete. Your device will then reboot, which might take slightly longer than usual.
Benefits of Regularly Clearing Cache on Samsung
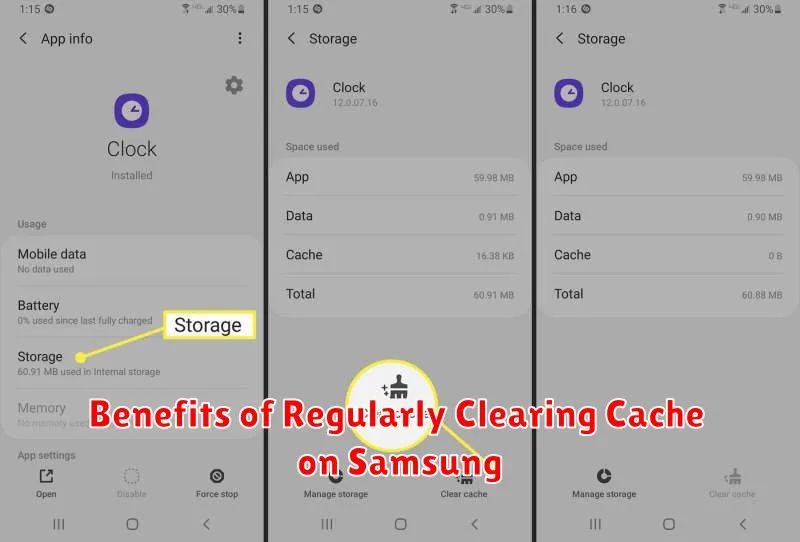
Regularly clearing the cache on your Samsung device offers several advantages, contributing to a smoother and more efficient user experience. Improved performance is a key benefit. Over time, accumulated cache can slow down your device. Clearing it frees up resources, leading to faster app loading times and overall responsiveness.
Freeing up storage space is another advantage. While individual app caches might be small, they can collectively consume a significant amount of storage. Removing this unnecessary data can free up valuable space for files, photos, and other important content.
Clearing cache can also help resolve app malfunctions. Corrupted cache data can sometimes lead to app crashes, freezes, or other unexpected behavior. A fresh start can often resolve these issues and restore app stability.
Finally, clearing cache can contribute to enhanced privacy. Cached data can sometimes contain sensitive information. Regularly purging this data can help minimize the risk of privacy breaches.
Troubleshooting Common Cache Clearing Issues
Occasionally, users encounter issues while attempting to clear the cache on their Samsung devices. This section addresses some common problems and provides potential solutions.
Cache Won’t Clear
If you’ve followed the steps to clear your cache but it appears full, try restarting your device. A simple restart can often resolve temporary software glitches that might be interfering with the clearing process. If the issue persists after restarting, try clearing the cache in Safe Mode. This helps determine if a third-party app is causing the problem.
Insufficient Storage Space
While counterintuitive, sometimes insufficient storage space can prevent clearing the cache. Try freeing up some space by deleting unnecessary files or apps. Then, attempt to clear the cache again. Ensure you have sufficient storage before initiating the clearing process.
System Errors
If you encounter system errors during the process, consider checking for system updates. An outdated operating system can sometimes cause conflicts. Updating your software can often resolve these issues.